
What is the ESP8266 WiFi Module?
The ESP8266 is a low-cost Wi-Fi microcontroller chip developed by Espressif Systems, based in Shanghai, China. It quickly became a game-changer for DIY enthusiasts, IoT developers, and students because it made wireless connectivity both affordable and easily accessible.
What makes it special?
The ESP8266 isn’t just a basic Wi-Fi add-on – it’s a standalone system-on-chip (SoC) capable of performing processing and networking tasks. That means in many cases, you don’t even need an extra microcontroller like Arduino — the ESP8266 can handle everything itself!
Over the years, the ESP8266 has grown into one of the most popular platforms for building smart devices, home automation systems, and wireless IoT projects.
Why Choose ESP8266? (Advantages)
- Super Affordable – Costing just a few dollars
- Highly Versatile – Can be used as both Wi-Fi client and server
- Easy to Program – Works with Arduino IDE, MicroPython, Lua, and more
- Huge Community Support – Forums, tutorials, GitHub projects
- OTA Updates – Upgrade firmware wirelessly
- Compact Size – Ideal for embedded and portable applications
- Low Power Consumption – Suitable for battery-powered devices
Evolution of ESP8266 Modules (Brief Overview)
There are several types of ESP8266-based modules, each tailored for different project needs:
| Module | Description |
|---|---|
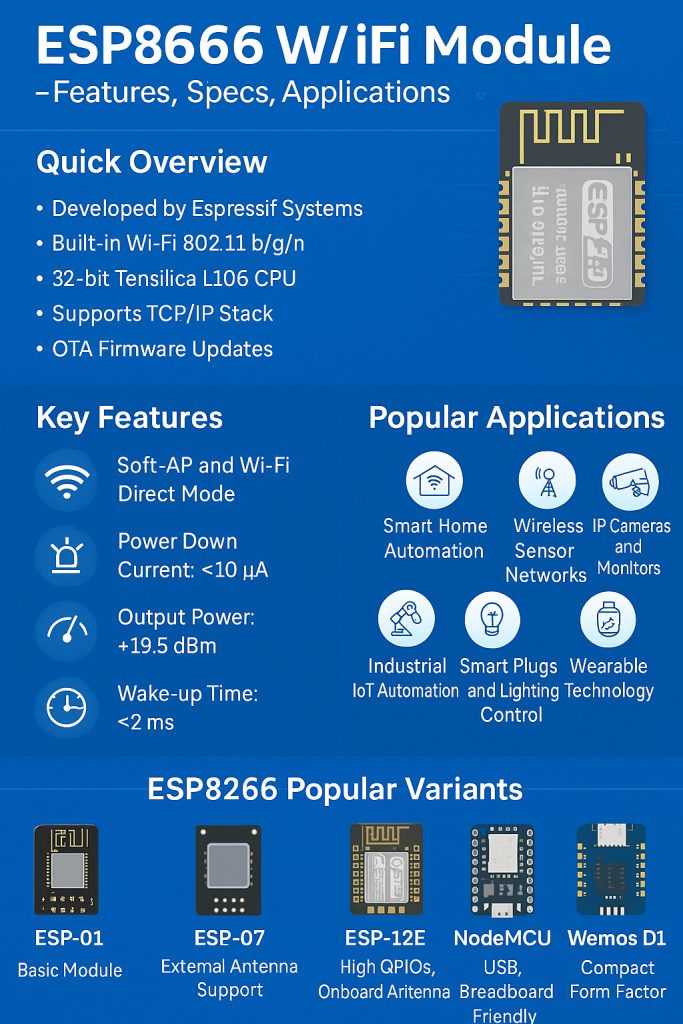
| ESP-01 | Smallest module with basic I/O, perfect for Wi-Fi add-on |
| ESP-07 | External antenna support, more GPIOs |
| ESP-12E | One of the most popular, with many GPIOs and integrated antenna |
| NodeMCU | Development board with USB interface and easy pin access |
| Wemos D1 Mini | Tiny Arduino-like board for compact projects |
Each module builds on the ESP8266 core chip but offers different I/O configurations, memory sizes, and form factors.
ESP8266 vs Arduino: Key Differences

| Feature | ESP8266 | Arduino Uno |
|---|---|---|
| Wi-Fi Connectivity | Built-in Wi-Fi | No Wi-Fi (requires shield) |
| Processor | 80-160 MHz, 32-bit | 16 MHz, 8-bit |
| Memory | Up to 4MB Flash | 32KB Flash |
| Programming Language | C/C++ (Arduino IDE), Lua, MicroPython | C/C++ |
| Cost | Lower | Slightly higher |
| Power Efficiency | Better (sleep modes) | Average |
Common Applications of ESP8266 WiFi Module
The possibilities are almost endless! ESP8266 is used in:
- Home Automation Systems (e.g., Smart Lights, Smart Switches)
- Wireless Sensor Networks (e.g., weather stations, soil sensors)
- Smart Plugs and Energy Monitoring
- Voice-Activated Assistants
- Smart Agriculture Solutions
- Industrial Automation
- Security and Surveillance (CCTV, IP Cameras)
- Wearables (basic health trackers)
- Wi-Fi Controlled Robots
- Smart Door Locks
- Wi-Fi Enabled Home Appliances
- IoT Development Boards and Prototyping Kits
Key Features of the ESP8266 Module
- Wi-Fi Standards: 802.11 b/g/n
- Wi-Fi Direct (Peer-to-Peer) and Soft Access Point (Soft-AP) Mode
- Built-in TCP/IP Stack (IPv4, TCP/UDP, HTTP, FTP)
- Integrated Circuitry: RF Balun, Power Amplifier, LNA
- 32-bit Tensilica L106 Microcontroller operating at 80-160 MHz
- Programmable via Arduino IDE, MicroPython, Lua
- Low Power Modes: Deep Sleep support for battery-operated projects
- Interfaces: UART, SPI, I2C, PWM, ADC
- Output Power: +19.5 dBm (maximum)
- Operating Temperature Range: -40°C to +125°C
- Operating Voltage: 3.0V – 3.6V
ESP8266 Technical Specifications
| Specification | Details |
|---|---|
| CPU | Tensilica L106 32-bit RISC |
| Operating Frequency | 2.4 GHz to 2.5 GHz Wi-Fi band |
| RAM | 32KB instruction + 80KB user data |
| Flash Memory | 512KB to 4MB (depending on module) |
| Interfaces | UART, SPI, I2C, PWM, SDIO, ADC |
| GPIOs | Up to 17 (based on module) |
| Encryption | WPA/WPA2, WEP, TKIP, AES |
| Wi-Fi Modes | Station, SoftAP, Station + SoftAP |
| Average Current | 70-80 mA during active Wi-Fi usage |
| Deep Sleep Current | ~10 μA |
How to Program ESP8266 Easily (Beginner Tips)
Programming the ESP8266 is super simple — here’s how you can start:
- Install Arduino IDE from the official Arduino website.
- Add ESP8266 Board Support
- Open Arduino IDE → File → Preferences → Add this URL under “Additional Boards Manager URLs”:
http://arduino.esp8266.com/stable/package_esp8266com_index.json - Go to Tools → Board → Board Manager → Search “ESP8266” and install.
- Open Arduino IDE → File → Preferences → Add this URL under “Additional Boards Manager URLs”:
- Connect your ESP8266 to your computer via USB (you may need a USB-to-Serial converter if using ESP-01).
- Select the right Board and Port in the Tools menu.
- Upload sample sketches (e.g., Blink, Wi-Fi Scan).
Congratulations! You’re now ready to build IoT projects with Wi-Fi!
Power Supply Requirements for ESP8266
The ESP8266 operates at 3.3V and requires a stable power source.
Warning: Supplying 5V directly can permanently damage your ESP8266.
Recommended setup:
- Use a 3.3V regulator if your source is 5V.
- Capacitors across Vcc and GND (10μF + 0.1μF) improve stability.
- Prefer external power supply for long-term, Wi-Fi heavy projects.
Important Best Practices When Using ESP8266
- Add a pull-up resistor to CH_PD (Chip Power-Down Pin) to keep the chip enabled.
- Use a level shifter if interfacing 5V logic systems (Arduino Uno) with 3.3V ESP8266.
- Always check the pinout of your module (ESP-01, ESP-07, ESP-12E) before connecting peripherals.
- Implement proper OTA (Over-the-Air) firmware updates if deploying remotely.
Additional Resources to Explore
- Official ESP8266 Datasheet (PDF)
- Espressif Developer Documentation
- ESP8266 Arduino Core GitHub
- MicroPython on ESP8266 Guide
- ESP8266 Community Forum
Quick Recap
- ESP8266 is an affordable Wi-Fi chip.
- It can act as both a server and a client.
- It can be programmed using Arduino IDE, Lua, or MicroPython.
- Perfect for beginners stepping into IoT development.
Final Thoughts
The ESP8266 WiFi Module continues to dominate the DIY and IoT space even in 2025.
Its affordability, flexibility, ease of use, and wireless capabilities make it the perfect microcontroller for anyone starting with smart devices, home automation, or IoT systems.
Whether you’re a beginner or a professional, the ESP8266 gives you the power to create powerful, connected devices without breaking the bank!
Ready to build your first Wi-Fi project?
Share your thoughts, project ideas, or questions in the comments — we’d love to hear from you!
See also: IoT based Smart Parking System using RFID ESP8266; Mobile App
See also: How to Design IoT Dashboard using Node-RED: Step-by-Step Tutorial
If you enjoyed this article, don’t forget to subscribe to our YouTube Channel for free IoT video tutorials and project ideas!