Distance Measurement Using Ultrasonic Sensor and Arduino – Detailed Project Overview
Measuring the distance between objects is a key function in many real-world applications. Whether it’s monitoring the water level in a tank, helping a robot detect nearby obstacles, or automating parking systems, distance sensing plays a vital role.
This project introduces a simple yet powerful method to measure distance using the HC-SR04 Ultrasonic Sensor paired with an Arduino UNO. The goal is to measure the distance from the sensor to an object placed in front of it and display that distance on a 16×2 LCD screen.
Why Use Ultrasonic Sensors for Distance Measurement?
Ultrasonic sensors work by emitting high-frequency sound waves (inaudible to humans) and measuring the time it takes for the echo to return after hitting an object. Since the speed of sound in air is known, the Arduino can calculate the distance based on the time delay.
What makes ultrasonic sensors like the HC-SR04 especially useful is their ability to:
- Measure distances without physical contact
- Work in a variety of lighting conditions (unlike infrared)
- Deliver fast and reliable results
- Be cost-effective and easy to integrate into microcontroller projects
This makes them ideal for use in student projects, industrial automation, home systems, and robotics.
Components Required (with Description)
Below is a list of all the components you’ll need to build this project, along with an explanation of their roles:
1. Arduino UNO Board
- Function: Acts as the brain of the project. It sends and receives signals to and from the ultrasonic sensor and processes the data to calculate the distance.
- Why It’s Used: The Arduino UNO is beginner-friendly, affordable, and has enough digital pins to easily connect to the HC-SR04 and LCD module.
2. HC-SR04 Ultrasonic Distance Sensor
- Function: Sends out ultrasonic sound waves and detects the echo when they bounce back from an object. It provides the time taken for the round trip, which the Arduino uses to calculate distance.
- Range: Typically measures distances from 2 cm to 400 cm with reasonable accuracy.
- Pins: VCC (power), GND (ground), Trig (trigger pulse from Arduino), Echo (echo pulse back to Arduino)
3. 16×2 LCD Display (with or without I2C module)
- Function: Displays the measured distance in centimeters or inches.
- Why It’s Used: A 16×2 LCD can show two lines of text, perfect for real-time output like “Distance: 123 cm”.
- I2C Optional: If using an I2C module, it reduces the number of pins required for connection (only 4 pins instead of 6+).
4. Breadboard
- Function: Provides a solderless way to build the circuit and make connections between components easily.
- Why It’s Used: Essential for prototyping and testing without permanent soldering.
5. Jumper Wires (Male-to-Male)
- Function: Connect components on the breadboard to the Arduino and to each other.
- Tip: Use color-coded wires to keep your connections organized (e.g., red for power, black for ground).
Ultrasonic sensor HC-SR04
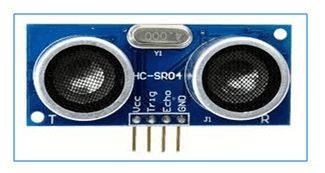
Interfacing HC-SR04 to a microcontroller is very much easy. trig pin is used to trigger an ultrasonic sensor and then “listen” for the echo pulse. The sensor measures the time required for the echo return, and returns this to the microcontroller as a variable pulse width via the echo pin.
Key Features:
- Precise, non-contact distance measurements
- Range 2 cm to 4 m range
- work in any lighting condition
- Requires just two microcontroller I/O pin
- Power requirements: +5 VDC;
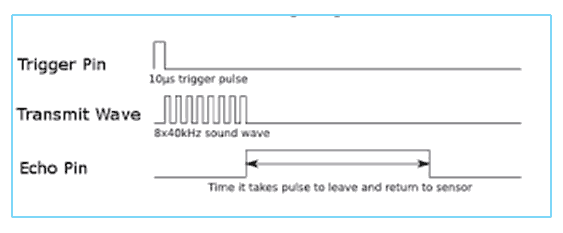
Timing Diagram
The module works on the natural phenomenon of ECHO of sound. A high pulse is sent for about 10us to trigger the module. After which the module sends 8 cycles of 40 KHz ultrasound signal through transmitter and checks its echo received at receiver. By using this time span triggering pulse and echo you can calculate the distance by using formula as
Distance = (time x Speed)/ 2
Where speed= 340m/s (speed of sound wave or ultrasonic signal)
Here we have divided the product of speed and time by 2 because the time is the total time it took to reach the obstacle and return back.
Circuit Diagram (Distance Measurement using ultrasonic Sensor project with Arduino)
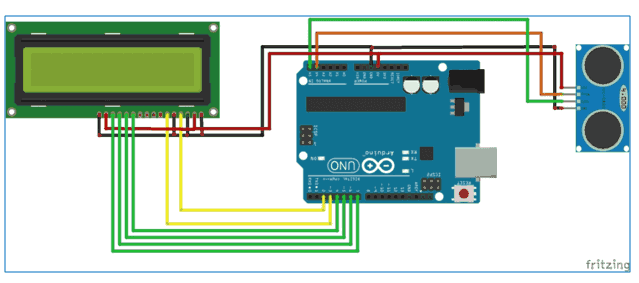
In-circuit connection
Ultrasonic sensor module’s
- “trigger” to A4of arduino
- “echo” to A5of arduino
- Vcc to 5V and
- Gnd to Ground of Arduino
16×2 LCD connected in 4-bit mode as
- RS – pin 2
- En–pin 3
- D4-D7 –pin 4- pin7
- RW, LED-, Vss– GND and Vdd, LED+ – 5V
See also: Fritzing Software tool for Electronics Circuit design without Hardware
Code:
#include <LiquidCrystal.h>
#define trigger 18
#define echo 19
float time=0,distance=0;
LiquidCrystallcd(2,3,4,5,6,7);
void setup()
{
lcd.begin(16,2);
pinMode(trigger,OUTPUT);
pinMode(echo,INPUT);
lcd.setCursor(0,1);
delay(2000);
lcd.clear();
delay(1000);
}
void loop()
{
lcd.clear();
digitalWrite(trigger,LOW);
delayMicroseconds(2);
digitalWrite(trigger,HIGH);
delayMicroseconds(10);
digitalWrite(trigger,LOW);
delayMicroseconds(2);
time=pulseIn(echo,HIGH);
distance=time*340/20000;
lcd.clear();
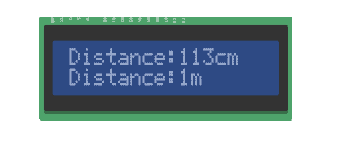
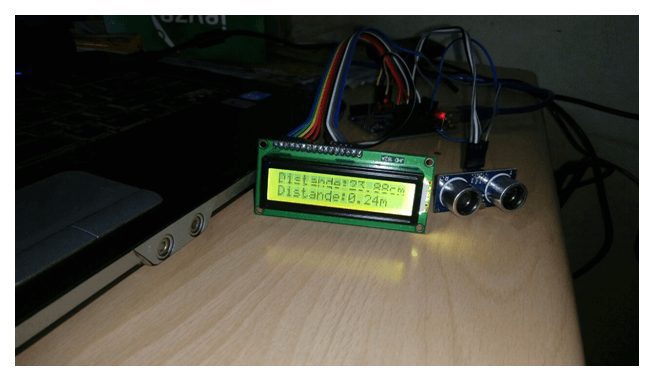
lcd.print(“Distance:”);
lcd.print(distance);
lcd.print(“cm”);
lcd.setCursor(0,1);
lcd.print(“Distance:”);
lcd.print(distance/100);
lcd.print(“m”);
delay(1000);
}
Results:
See also: Arduino Traffic Light Controller || IoT Project
Let us know what you think about Arduino project distance measurement using ultrasonic sensor in the comment section below, if you have new ideas on distance measurement using ultrasonic sensor and Arduino, please let us know.
Ready to Explore More? Let’s Build Smarter Together!
🔔 Subscribe to Our YouTube Channel » for IoT video Tutorials.
🌐 Start Learning IoT Basics Now » and What is IoT? – Introduction to IoT for Beginners on IoTDunia.com!
and Check out Top IoT Applications in Real World – Smart Use Cases 2025, IoT career guide 2025, Best Projects on IoT for Beginners
👉 Have questions? Drop them in the comments!
💡 Start small, stay curious, and make your world smarter—one device at a time.