Ready-to-use full-stack IoT solution: Don’t worry about the Tech
Getting Started your IoT Product development with SensiEDGE BLE & CloudThing middleware:
SensiEDGE’s “IoT Hardware Ready” and CloudThing Internet of Things cloud middleware form a powerful package which provides a ready-to-use full-stack IoT solution. Developers can use it for IoT product development without any hardware or software worry. IoT Product.
In this step-by-step 8-minutes-long tutorial you’ll be guided through setting up the cloud platform and connecting your SensiBLE hardware. Please, be advised: it’s dead-easy, so you probably won’t spend your whole afternoon here!
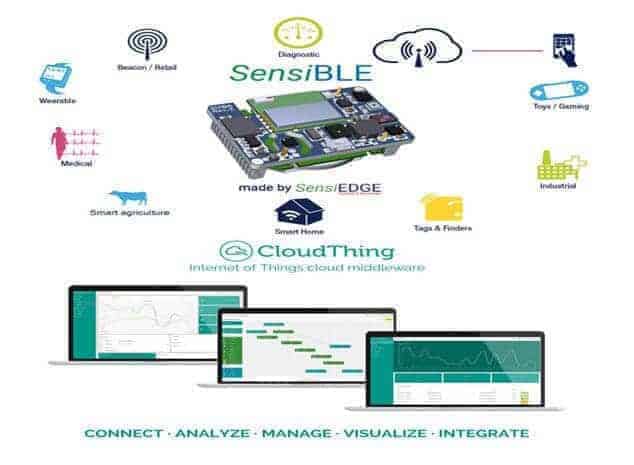
SensiEDGE || SensiBLE — What are these?
Imagine you have industrial-grade, ready-to-use and configurable hardware remaining at your disposal. Something you could take right off-the-shelf, implement within your product and configure it, according to the requirements. Imagine that you don’t have to deal with the long and expensive hardware development process or manufacturing, or even the logistics, and still, you could be able to ship your products with industrial-grade electronics inside. IoT Product development.
That’s exactly what SensiBLE is — a low power, small form factor (20x30mm), ready-to-use on-board system, fitted with the following sensors: 3-axis accelerometer, 3-axis magnetometer, 3-axis digital gyroscope, pressure, relative humidity, ambient light and temperature sensors. Have I mentioned the microphone already? Bluetooth Low Energy (BLE) 4.1 connectivity system, as well as Low Power ARM® 32-bit Cortex®-M4 CPU with FPU are on-board as well.
See also: SensiBLE IoT module- will help you to build your IoT Product
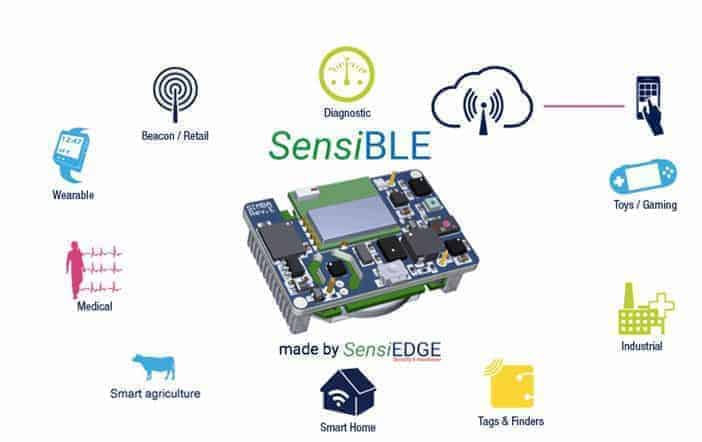
SensiBLE hardware module by SensiEDGE for IoT product development.
Not interested in Bluetooth? Modules for sub-GHz and Lora are on the way too!
So, what is this CloudThing?
As we have the hardware issues sorted out already, what about the cloud solution? Every end-to-end IoT Solution requires some cloud back-end to facilitate connectivity, data storage and analytics, moreover, it would be highly desirable to have the system integrated with custom or even third party applications.
Using Cloudthing for IoT product development its easy to proceed without any worry .
Here CloudThing comes in handy, allowing you to reduce the time-to-market and cost. CloudThing is an IoT cloud middleware, designed specifically for solution developers and engineers working on system integration projects. The said hardware-agnostic platform enables you to connect any device, via the Internet (MQTT, HTTP, CoAP), Sigfox or LoraWAN. Secondly, it provides the user with a security layer and fleet management capabilities, including the OTA updates option.
See also: MQTT and HTTP : Comparison between two IoT Protocols
Data downloaded from the devices attached may be stored, visualized and analyzed with the use of a GUI drag & drop Big Data editor. Development of the final solutions and integration are all made simpler and accelerated by the SDKs and an expansive family of APIs. You need on-premise or hybrid deployment? No worries, CloudThing is ready to be licensed for that kind of projects as well!
CloudThing — the middleware for Internet of Things cloud systems

Step 1 — Set your cloud up!
If you still have not registered an account on the CloudThing.io platform — do not hesitate and do it now here! If you already have an account, skip to the next step.
Following the registration process, you’ll receive a new virtual host with auto generated tenant’s name. We will send you an email with a confirmation link. Without the confirmation, you won’t be able to log into your account, so make sure that you have entered a correct email address at the preceding stage. Please, make sure you remember your tenant’s name and the URL of your CloudThing platform!
Step 2 — Create a new product and generate credentials!
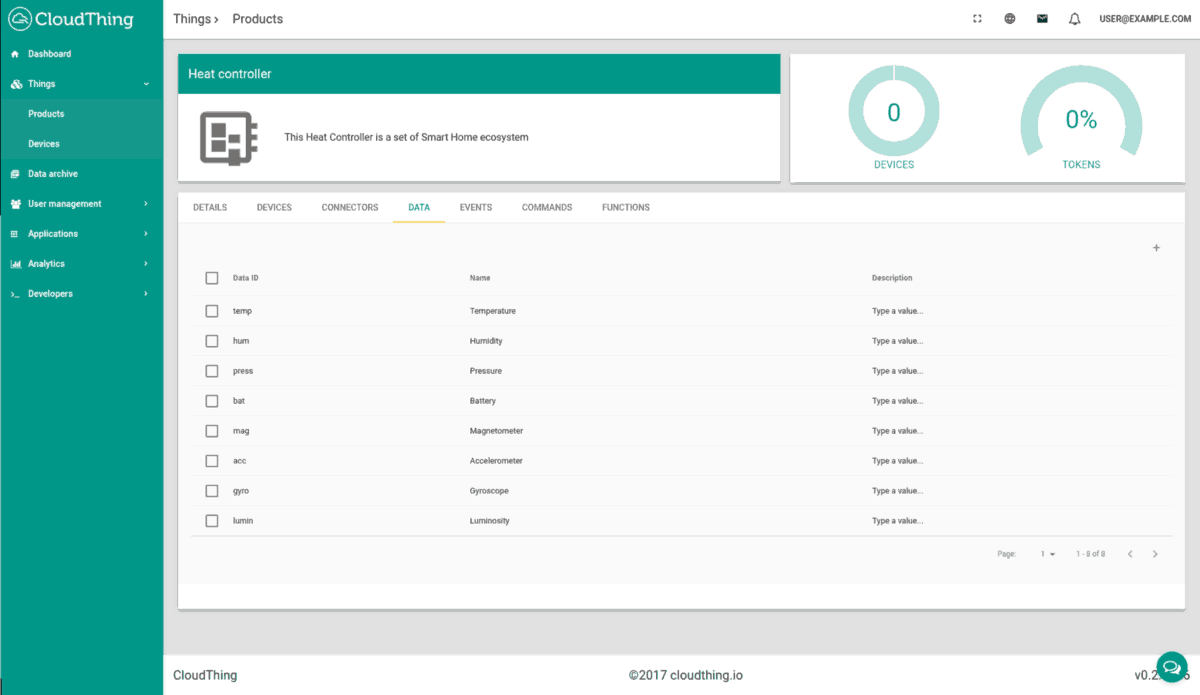
Once you’ve logged into the web application, navigate to Things > Product and create a new item, clicking the plus mark. Choose a proper name and (optionally) add the product’s description (e.g. “Heat controller”, “This Heat Controller is a component of the Smart Home ecosystem”). If that’s not enough, you may even upload an image of your product! Then click on the Save & configure button.
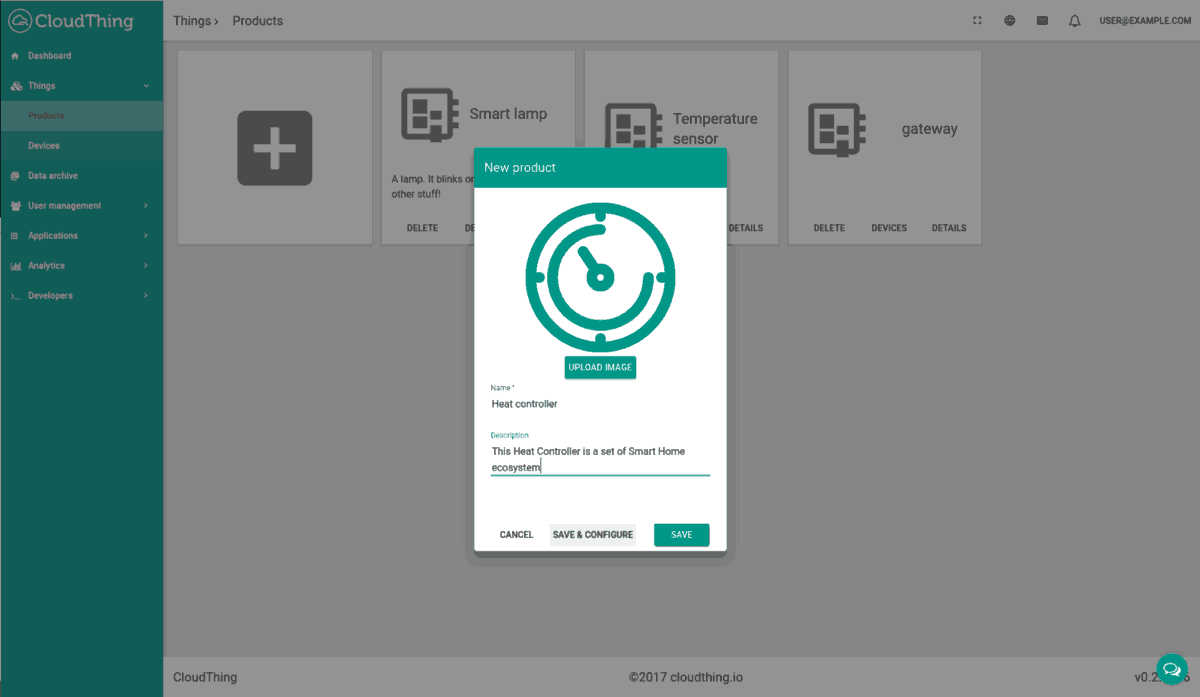
Having completed the previous step, go to the DEVICES tab and add a new device. A new ID/token pair will be generated, click on ID and go to the Device card.

Generating credentials for a new device on CloudThing.
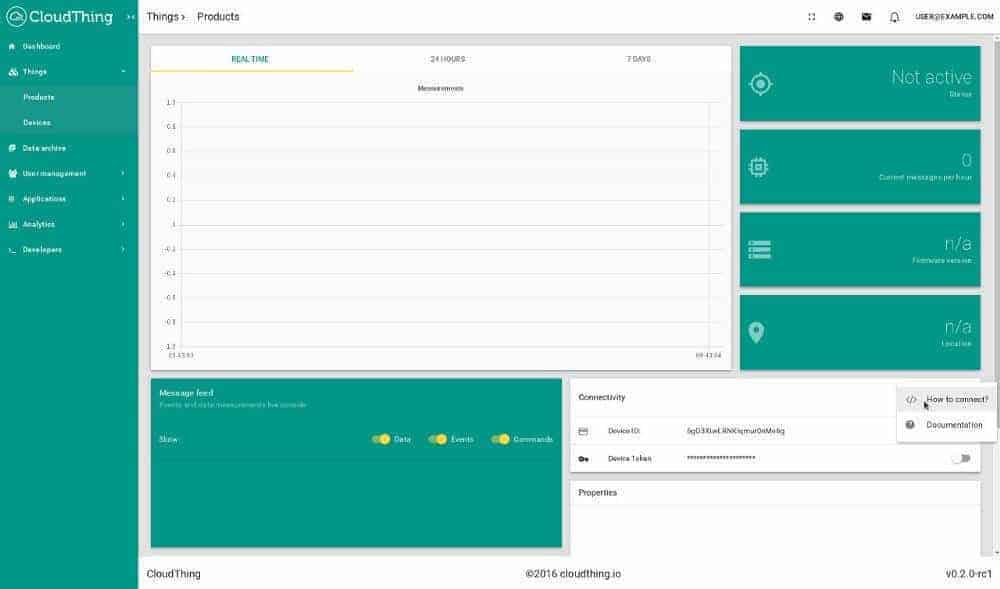
Device view for managing and reading data of IoT Product.
As you can see, the device remains inactive, which means that it has never sent any messages to the platform. To start sending the measurement data we have to associate a new SensiBLE component!
Step 3 — Connect your SensiBLE!
Switch your SensiBLE on and launch the mobile application (you can download it here). Now it’s high time to sync your smartphone with SensiBLE, associate it with the CloudThing’s device and route data onto the cloud!
Open SensiEDGE CloudThing application (1). Now, enter your tenant’s short name (an instance id) and device credentials — ID and token, both of which can be found on the Device tab within the web application (2). Now, associate the credentials provided with the SensiBLE module (3).
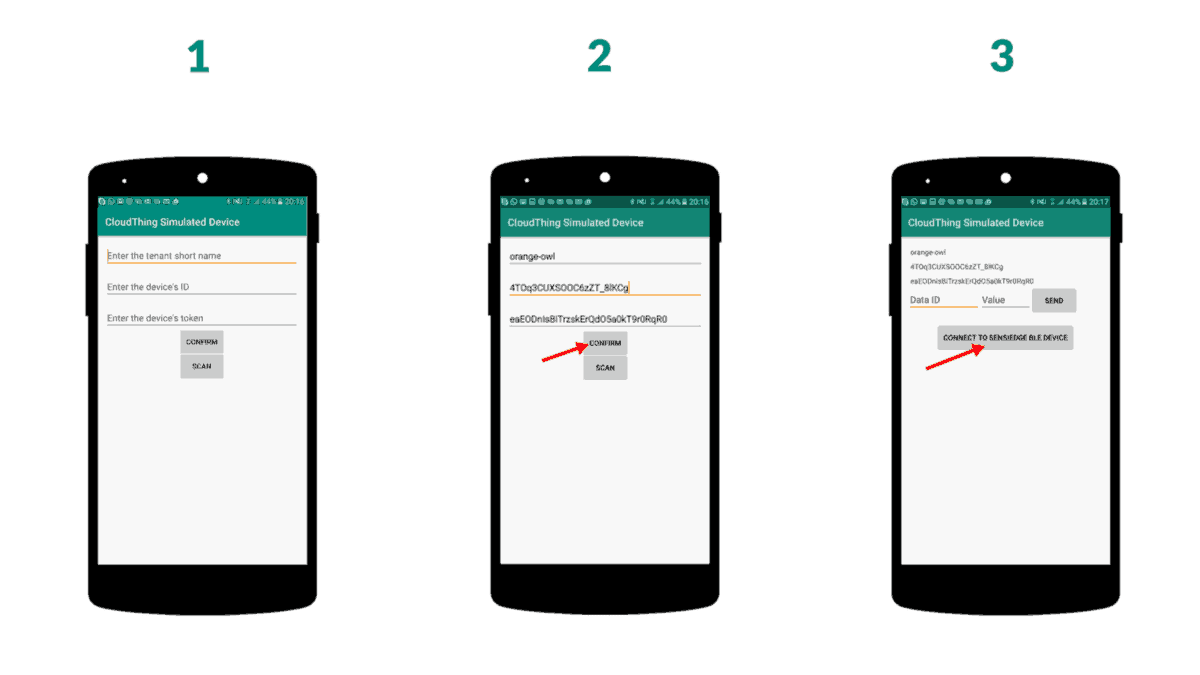
Providing CloudThing’s credentials to the mobile application for IoT Product.
Press on the look icon (4) — the application will start scanning for near SensiBLE devices. Choose the SensiBLE you want to associate (5) — the list of available measurements will be displayed. Press the Temperature item (6). Now, you are able to have a temperature readout displayed, along with 14 other parameters, which may be displayed too.
If the app is not revealing SensiBLE device, please set the proper permissions by following Setting -> Applications -> Application Manager -> SensiEDGE app -> active permission.

Discovering SensiBLE devices
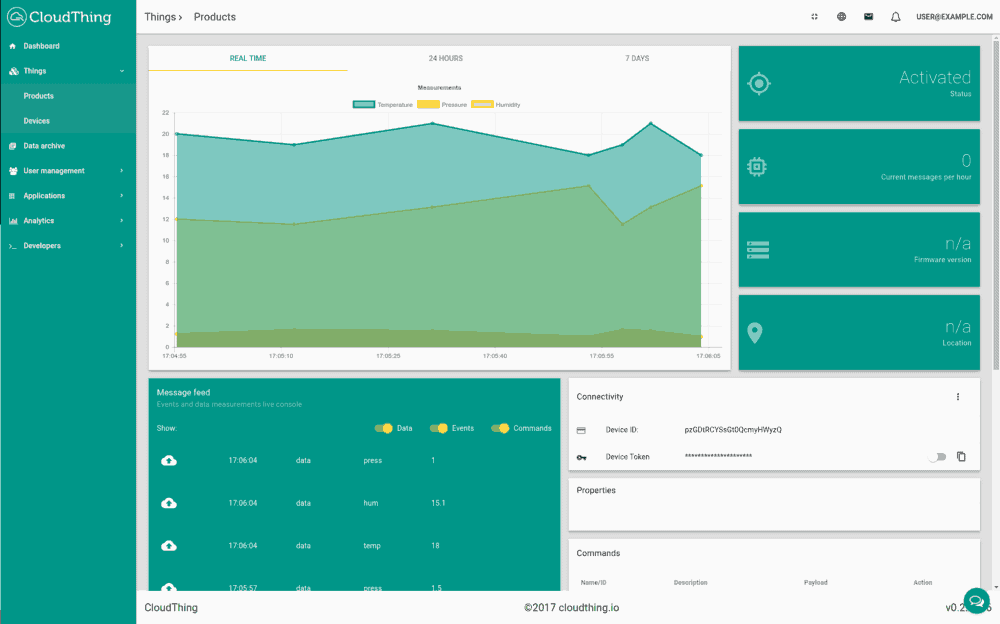
After the association procedure is performed, the mobile application starts to route measurements from SensiBLE module to your configured CloudThing instance. You can verify this and see that the incoming data is being registered within the DATA tab — feel free to change the names or descriptions for the measurements!
Having done that, you may check the visualization of incoming data on the Device page!
Step 4 — Analytics & Alerts
Having connected your operable SensiBLE, you may move on to some serious, real deal stuff, as the true power of the IoT can be unleashed only through usage of Big Data and analytics.
Before you take any further steps, define a goal for yourself. Let’s assume that your SensiBLE has been tasked with monitoring the temperature at a manufacturing site, inside the production hall. Since the temperature has a critical meaning for the production process, its supervisors need to receive immediate alerts, when its value is too high. However, one should take into account the fact that there are irrelevant temporary temperature peaks within the room that should be disregarded by the alerting system. Our goal here would be be to calculate the moving average on real-time temperature data stream and trigger the alert only when the value is too high.
No worries, you don’t have to write a single line of code for this type of an analysis!
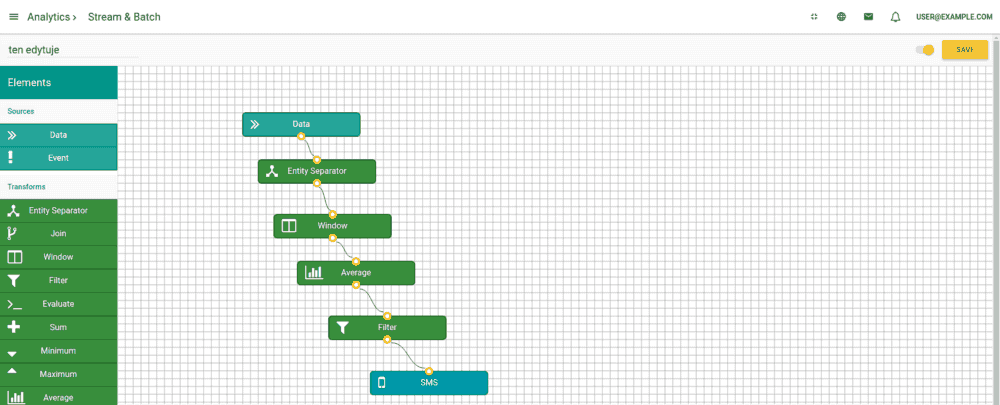
Navigate to Analytics > Stream & Batch and create new pipeline. Click on its name in order to edit the diagram. Here’s one of the coolest features of CloudThing — Drag’n’Drop Big Data and Flow Editor!
You should see a blank canvas with nodes located on the sides of the screen, choose from. Drag the Data node and drop it onto the canvas. This node represents the “incoming data” stream. Click on it in order to edit the options within the node. Choose the product that you defined earlier as the source of data (Heat Controller in this example).

Data node output will send out all of the data coming from the heat controllers. Since our objective is to calculate the moving average for particular devices (not based on measurements from all of them) we have to split the data stream into smaller, individual streams — each one of them would refer to each of the heat controllers.
Here’s where the Entity Separator comes into play. Analysis following this block would be performed independently for all of the heat controllers. Moving average is very easy to implement with the use of predefined nodes — Window holds a stream and buffers the incoming data into a single batch, with a configured and defined time interval. Should you be willing to calculate moving average every 1 minute with the use of data gathered throughout 10 minutes, you should type in 10m and 1m into the Period and Every fields respectively.
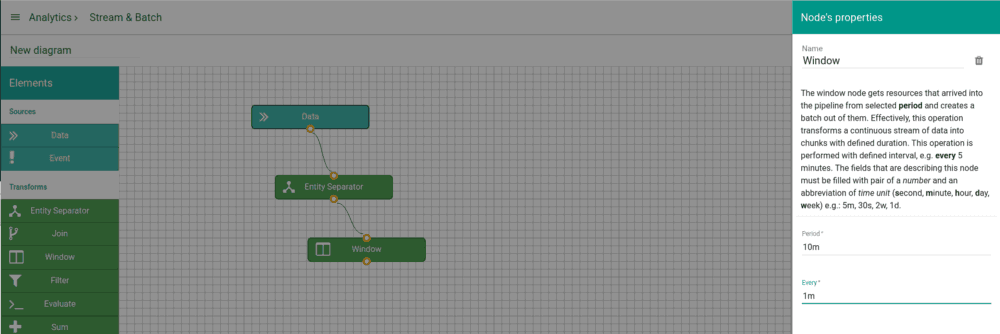
This node produces an output in a form of a batch of samples — now, let’s connect it to the Average node, to get the exact result we are aiming for. It is now enough to select a proper value, which then would be utilized in case of the calculation — type {{data.temp}} item. This expression makes the CloudThing’s processing engine look for samples with data IDs which equal to temp. Our data-stream generates a new value every 60 seconds! What about the alerts?
The staff shall intervene solely when the temperature exceeds the value of 30 degrees. Considering the above, we should filter out all results which are lower or equal to the said value! To do this, we need to utilize a Filter node (surprising name, isn’t it?). Here, another expression is to be utilized: {{data.mean}} > 30. All of the mean values greater than 30 will pass through the Filter node.
Finally, now is the time to generate alerts — CloudThing comes with a few options here, including custom HTTP requests, so it is possible to integrate any API with our stream processing. For now, let’s try the good, old-fashioned SMS and text messages — choose the right node, type in the phone number and the message content (yes, you can use expressions here as well!).
Save the diagram and launch it — congratulations, your stream analytics solution became operational, feel free to test it!
You’ve been accelerated, sorry for the convenience
During this 8 minutes tutorial, you’ve connected more than 10 sensors to the scalable cloud solution and stopped worrying about the PCB/RF design, infrastructure maintenance, or ordinary coding, which is just boring, to be honest. What’s next? Whatever you want and need to do!
SensiEDGE and CloudThing offer tools, like libraries or SDKs, that could be used for boosting your business project even more, and letting you focus on what’s really important — your product and business, not wires and servers.
You’ve been accelerated, sorry for the convenience.
SensiBLE is a product made by SensiEDGE, the hardware design and manufacturing company. For more information please visit www.sensiedge.com
CloudThing is a product designed and developed by Husar Labs, IoT software and solutions provider. For more information please visit www.cloudthing.io and www.husarlabs.com
See also: 5 Steps Connect SensiBLE module to IBM Watson || IoT Module to Cloud
Let us know what you think about IoT Product development with cloudthing IoT platform in the comment section below.
If you like this post subscribe to our YouTube Channel for IoT video Tutorials.
and If you have smart product or service and looking for perfect audience then submit a guest post at IoTDunia and get to know in IoT world.
About Author:
Borys Tomala– CEO @ HusarLabs.com & CloudThing.io. Helping startups & companies bring their IoT and Cloud products to live, changing the energy industry with AI & BigData.