
Automatic Hand Sanitizer Dispenser
The Covid 19 pandemic has changed our lifestyle forever and affected everybody’s life all across the world. Social distancing, wearing a mask and following proper sanitization protocols can help prevent the spread of the virus.
To prevent the spread of the virus, we must wash our hands with soap at regular intervals, but if this option in not available, alcohol-based sanitizers can also be used.
Reopening of public places after the lockdown is over has made the installation of hand sanitizers mandatory at these places.
The presently available hand sanitisers at public places need to be pressed manually. Hence, physically touching the hand sanitiser’s bottles could create more risk of infection.
To solve this problem, we will create a contactless automatic hand sanitizer dispenser with the help of Arduino UNO. This system will be very easy to use and cost-effective.
This system is made with the help of Arduino UNO, Ultrasonic Sensor HC-SR04 and a servo motor. The ultrasonic sensor uses ultrasonic sound waves to detect the object.
Here, the ultrasonic sensor is used to detect the hands of the user. The ultrasonic sensor uses a 5V power supply and contains an Echo and trigger pin.
In this circuit, we will connect the trigger pin of the ultrasonic sensor to the D3 of the Arduino board and the D2 pin of the Arduino to the echo pin of the ultrasonic sensor.
Whenever the ultrasonic sensor finds an obstruction in its line-of-sight, that is whenever it senses the user’s hand, it measures the distance between the hand and the sensor.
If the distance lies within the desired range, Arduino will write the servo to 90. Arduino writes 90 degrees to the servo motor only when the distance is greater than 3 cm and less than 10 cm.
The servo motor turns and pushes the sanitizer’s dispenser and accordingly, the sanitizer is dispensed at the user’s hands. A delay of 100 milliseconds is added for the next reading.
Therefore, this is how we can make a completely contactless Automatic hand sanitizer dispenser project with minimal components and less time.
Components required
- Arduino UNO R3
- Ultrasonic Sensor HC-SR04
- Breadboard
- Jumper wires
- AA battery – 4
- Servo Motor
- AA battery case
- Hand sanitizer
Circuit Diagram
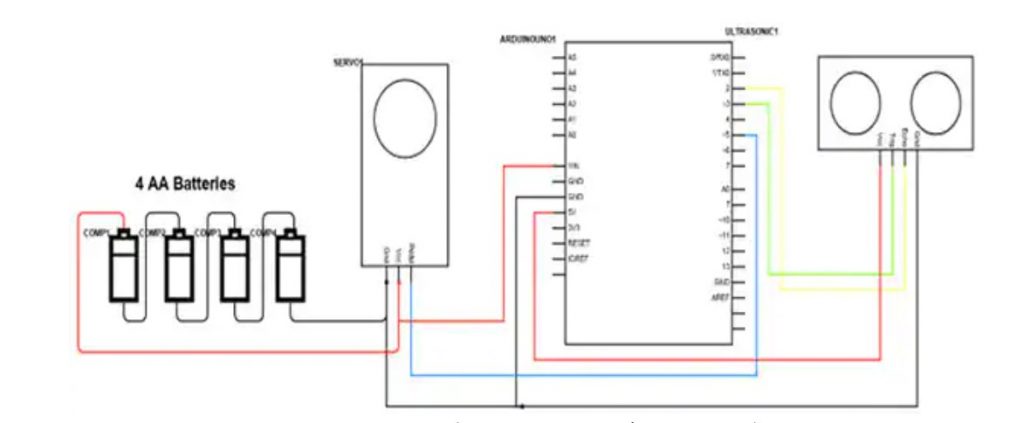
Image 1 credit: mentioned below
Code
#include <Servo.h>
// HC-SR04 Echo Pin & Trigger Pin connect to the Arduino Uno Digital Pins
#define echo_pin 2
#define trigger_pin 3
// Servo PWM
#define servo_pin 5
Servo servo_motor;
void setup() {
pinMode(trigger_pin, OUTPUT);
pinMode(echo_pin, INPUT);
Serial.begin(9600);
servo_motor.attach(servo_pin);
}
void loop() {
digitalWrite(trigger_pin, LOW);
delayMicroseconds(2);
digitalWrite(trigger_pin, HIGH);
delayMicroseconds(10);
digitalWrite(trigger_pin, LOW);
long duration = pulseIn(echo_pin, HIGH);
double distance = duration * 0.034 / 2;
Serial.print(distance);
// If the distance read by the sensor is less than 10 cm and more than the minimum 3 cm, then it is assumed that there is a hand under the sanitizer
if ((distance > 3) && (distance < 10)) {
servo_motor.write(90);
delay(100);
}
servo_motor.write(0);
}
Output Images
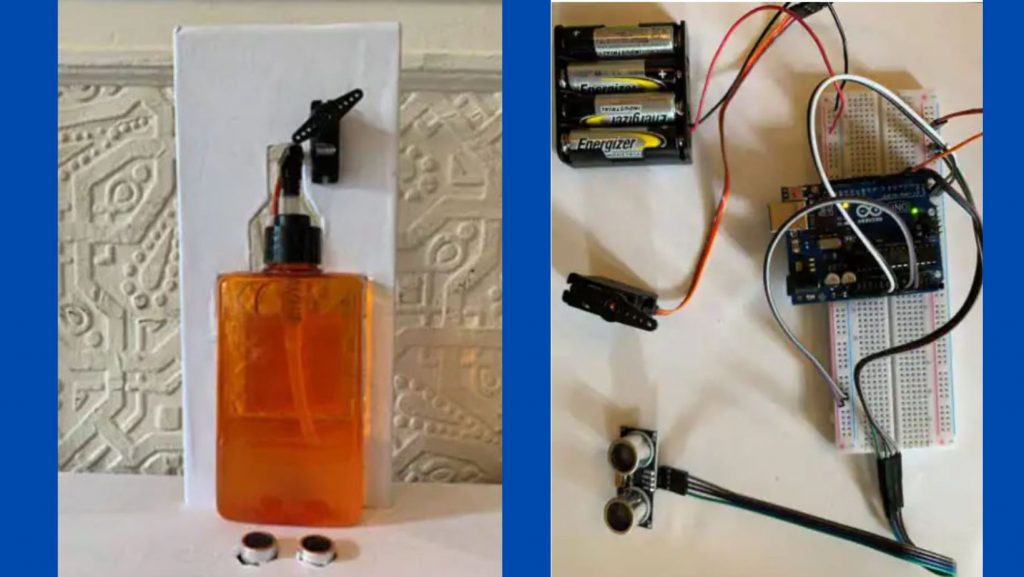
Image 2 credit: mentioned below
Advantages
- Contactless
- Cost effective
- Can fit most of the sanitizer bottles available in markets
Disadvantages
- If the servo motor horn is not fixed to the shaft of the motor properly, the motor might slip while pushing the sanitizer’s dispenser.
Applications
- Offices
- Schools
- Malls
- Shops
- Markets
- Hospitals
See also: GSM based Fire Alarm System using Arduino – IoT Project
See also: IoT Based Automatic Table Lamp using Arduino; DIY Project
Let us know what you think about automatic Hand sanitizer dispenser project using Arduino in the comment section below.
If you like this post subscribe our YouTube Channel for IoT video Tutorials.
Image 1 and 2 credit: digikey