
IoT Based Heart Rate Monitoring System
Monitoring the heart rate is an important factor in maintaining our heart health. Our heart rate helps in determining our fitness level. Monitoring our heart health can help in detecting early signs of heart attack.
In this project, we will make a heart rate monitoring system with the help of Arduino, and heart beat sensors.
This system counts the heartbeat, calculates the heart rate and displays it in the LCD in BPM (Beats per minutes).
The sensors will read the value of heart beat of a person. The heart beat sensor is controlled by the Arduino module.
It reads the pulses from the sensor and calculates the heart rate and then sends this information to the LCD display. There, this information is displayed to the user.
The connection of the Arduino, LCD and the heart beat sensor is done as follows:
- Pin 8 of Arduino is connected to the heart beat sensor module.
- Vcc and GND are connected to Vcc and GND.
- 16×2 LCD is connected with Arduino in 4-bit mode.
- Control pin RS, RW and En are directly connected to Arduino pin 12, GND and 11.
- Data pin D4-D7 is connected to pins 5, 4, 3 and 2 of Arduino.
- The start push button is connected to pin 7 and reset push button is connected to pin 6 of Arduino with respect to ground.
In this system,
only five pulses is read and the heart rate is calculated using the following formula:
Five_pusle_time = time2-time1;
Single_pulse_time = Five_pusle_time /5;
rate=60000 / Single_pulse_time;
Here, time1 = first pulse counter value
time2 = last pulse counter value
rate = final heart rate.
When the first pulse is read, the counter is started in the Arduino using the time counter function milis(). We store the first pulse counter value from milis() and store the value in time1 variable.
After receiving the next five pulses, the counter value is stored in the variable time2. The value of time1 is subtracted from time2 to get the original time taken by the five pulses.
This value is divided by 5 to get the time taken by one single pulse. The final rate is calculated by dividing 600000 milliseconds by single pulse time.
Components required:
- Arduino UNO
- Pulse Sensor
- LCD
- Breadboard
- 1k resistors
- 10k potentiometer
- 220 ohm resistors
- LED
- Jumper wires
Block Diagram
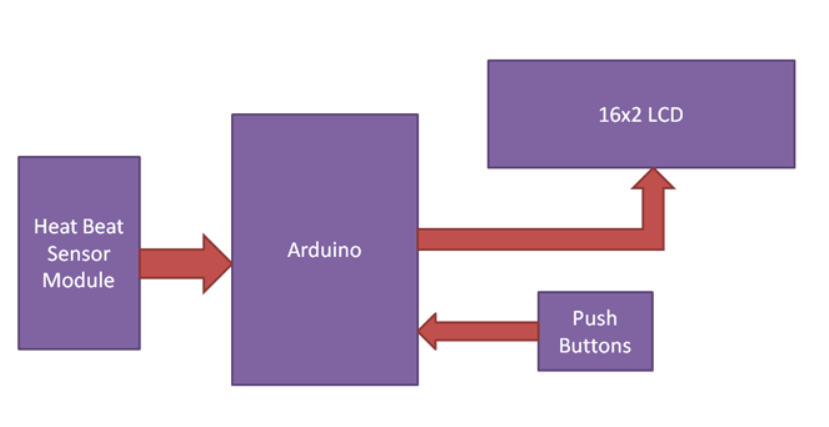
Image 1
Circuit Diagram
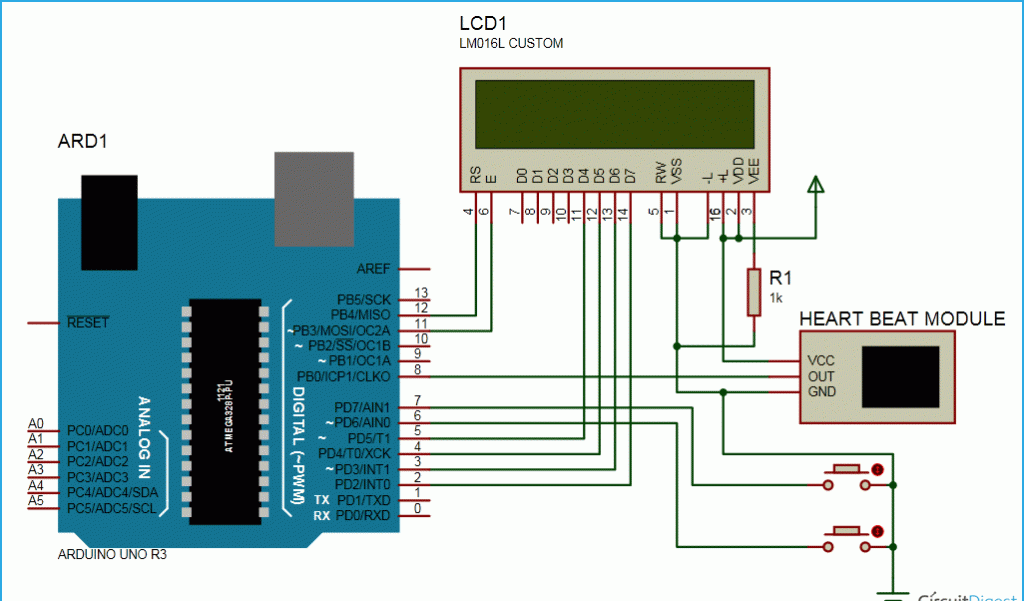
Image 2
Code
#include<LiquidCrystal.h>
LiquidCrystal lcd(12, 11, 5, 4, 3, 2);
int in = 8;
int Reset=6;
int start=7;
int count=0,i=0,k=0,rate=0;
unsigned long time2,time1;
unsigned long time;
byte heart[8] =
{
0b00000,
0b01010,
0b11111,
0b11111,
0b11111,
0b01110,
0b00100,
0b00000
};
void setup()
{
lcd.createChar(1, heart);
lcd.begin(16,2);
lcd.print(“Heart Beat “);
lcd.write(1);
lcd.setCursor(0,1);
lcd.print(“Monitering”);
pinMode(in, INPUT);
pinMode(Reset, INPUT);
pinMode(start, INPUT);
digitalWrite(Reset, HIGH);
digitalWrite(start, HIGH);
delay(1000);
}
void loop()
{
if(!(digitalRead(start)))
{
k=0;
lcd.clear();
lcd.print(“Please wait…….”);
while(k<5)
{
if(digitalRead(in))
{
if(k==0)
time1=millis();
k++;
while(digitalRead(in));
}
}
time2=millis();
rate=time2-time1;
rate=rate/5;
rate=60000/rate;
lcd.clear();
lcd.print(“Heart Beat Rate:”);
lcd.setCursor(0,1);
lcd.print(rate);
lcd.print(” “);
lcd.write(1);
k=0;
rate=0;
}
if(!digitalRead(Reset))
{
rate=0;
lcd.clear();
lcd.print(“Heart Beat Rate:”);
lcd.setCursor(0,1);
lcd.write(1);
lcd.print(rate);
k=0;
}
}
Output Images

Image 3
Advantages
- For Arduino, the programming can very easily modifiable
- Cheaper than most smart watches and heart rate monitors
- Portable and easy to use
- It can be monitored from anywhere
Disadvantages
- It might show incorrect results if we move our hand vigorously or flex the muscles near the wrist.
Applications
- Can be used as an alternate to expensive smart watches and heart rate monitors.
- Can be used in hospitals, clinics, labs, etc.
- Can be used at homes to monitor heart rate.
See also: GSM based Fire Alarm System using Arduino – IoT Project
Let us know your comment on “IoT based Heart rate monitoring system” in the section below.
If you like this post subscribe our YouTube Channel for IoT video Tutorials. You can also find us on Twitter, Facebook, and Instagram for more updates.
Start your IoT journey with IoT Basics from IoTDunia.
Image 1, 2 and 3 credit: circuitdigest