
Obstacle avoiding robot using Arduino
An obstacle avoiding robot is an intelligent autonomous device which can sense the obstacle in its path and avoid it by itself. The robot is designed in such a way that it can avoid obstacles in completely unknown environments. When this robot senses any obstacle in its path, instead of moving forward, it stops and checks both the left and right directions. It then takes the best possible path among the two.
To make this robot, we use ultrasonic solar sensors. We also use a servo motor is used to rotate the Ultrasonic Sensor to scan for obstacles.
This sensor helps in detecting the obstacles in the path by calculating the distance between the robot and the obstacle.
If the distance between the robot and the obstacle is less than 20 cm, the robot stops and checks the left and right directions for the distance with the help of an ultrasonic sensor and servo motor.
If the distance towards the left direction is more than that of the right side, the robot takes a left turn, else, it takes a right turn.
This same process continues until it finds another obstacle, and then the whole process is repeated. In this way, we can build an obstacle-avoiding robot from scratch.
Let us take a look at the pin configurations of the circuit:
L298n motor driver:
- +12V → Lipo battery (+)
- GND → Lipo battery (- )
- +5V → arduino Vin
- In1 → arduino digital pin 7
- In2 → arduino digital pin 6
- In3 → arduino digital pin 5
- In4 → arduino digital pin 4
- OUT1 → Motor 1
- OUT2 → Motor 1
- OUT3 → Motor 2
- OUT4 → Motor 2
Breadboard
- Connect two jumper wires to Arduino board 5V and GND pins, then connect both wires to breadboard. Now we can use this as +5V supply.
HC-SR04 Ultrasonic Sonar sensor
- VCC → breadboard +5V
- Trig → Arduino analog pin 1
- Echo → Arduino analog pin 2
- GND → breadboard GND
- TowerPro micro servo 9g:
- orange wire → Arduino digital pin 10
- red wire → breadboard +5V
- brown wire → breadboard GND
Components required
- Arduino UNO
- DC Motor – 2
- L298n motor driver
- HC-SR04 Ultrasonic Sonar sensor
- TowerPro micro servo 9g
- 4V 1300mah Lipo battery
- Smart robot car chassis
- Breadboard
- Jumper wires
- Soldering iron
- Screws and nuts
Circuit Diagram and Block diagram

Image 1
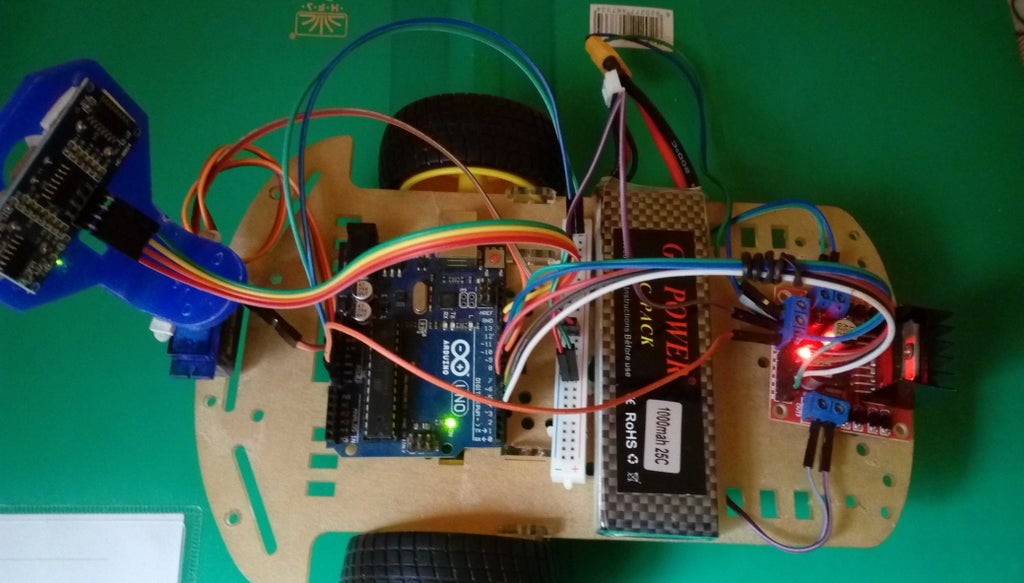
Image2
Code
#include <Servo.h> //Servo motor library. This is standard library
#include <NewPing.h> //Ultrasonic sensor function library. You must install this library
//our L298N control pins
const int LeftMotorForward = 7;
const int LeftMotorBackward = 6;
const int RightMotorForward = 4;
const int RightMotorBackward = 5;
//sensor pins
#define trig_pin A1 //analog input 1
#define echo_pin A2 //analog input 2
#define maximum_distance 200
boolean goesForward = false;
int distance = 100;
NewPing sonar(trig_pin, echo_pin, maximum_distance); //sensor function
Servo servo_motor; //our servo name
void setup(){
pinMode(RightMotorForward, OUTPUT);
pinMode(LeftMotorForward, OUTPUT);
pinMode(LeftMotorBackward, OUTPUT);
pinMode(RightMotorBackward, OUTPUT);
servo_motor.attach(10); //our servo pin
servo_motor.write(115);
delay(2000);
distance = readPing();
delay(100);
distance = readPing();
delay(100);
distance = readPing();
delay(100);
distance = readPing();
delay(100);
}
void loop(){
int distanceRight = 0;
int distanceLeft = 0;
delay(50);
if (distance <= 20){
moveStop();
delay(300);
moveBackward();
delay(400);
moveStop();
delay(300);
distanceRight = lookRight();
delay(300);
distanceLeft = lookLeft();
delay(300);
if (distance >= distanceLeft){
turnRight();
moveStop();
}
else{
turnLeft();
moveStop();
}
}
else{
moveForward();
}
distance = readPing();
}
int lookRight(){
servo_motor.write(50);
delay(500);
int distance = readPing();
delay(100);
servo_motor.write(115);
return distance;
}
int lookLeft(){
servo_motor.write(170);
delay(500);
int distance = readPing();
delay(100);
servo_motor.write(115);
return distance;
delay(100);
}
int readPing(){
delay(70);
int cm = sonar.ping_cm();
if (cm==0){
cm=250;
}
return cm;
}
void moveStop(){
digitalWrite(RightMotorForward, LOW);
digitalWrite(LeftMotorForward, LOW);
digitalWrite(RightMotorBackward, LOW);
digitalWrite(LeftMotorBackward, LOW);
}
void moveForward(){
if(!goesForward){
goesForward=true;
digitalWrite(LeftMotorForward, HIGH);
digitalWrite(RightMotorForward, HIGH);
digitalWrite(LeftMotorBackward, LOW);
digitalWrite(RightMotorBackward, LOW);
}
}
void moveBackward(){
goesForward=false;
digitalWrite(LeftMotorBackward, HIGH);
digitalWrite(RightMotorBackward, HIGH);
digitalWrite(LeftMotorForward, LOW);
digitalWrite(RightMotorForward, LOW);
}
void turnRight(){
digitalWrite(LeftMotorForward, HIGH);
digitalWrite(RightMotorBackward, HIGH);
digitalWrite(LeftMotorBackward, LOW);
digitalWrite(RightMotorForward, LOW);
delay(500);
digitalWrite(LeftMotorForward, HIGH);
digitalWrite(RightMotorForward, HIGH);
digitalWrite(LeftMotorBackward, LOW);
digitalWrite(RightMotorBackward, LOW);
}
void turnLeft(){
digitalWrite(LeftMotorBackward, HIGH);
digitalWrite(RightMotorForward, HIGH);
digitalWrite(LeftMotorForward, LOW);
digitalWrite(RightMotorBackward, LOW);
delay(500);
digitalWrite(LeftMotorForward, HIGH);
digitalWrite(RightMotorForward, HIGH);
digitalWrite(LeftMotorBackward, LOW);
digitalWrite(RightMotorBackward, LOW);
}
Output Images

Image3
Advantages
- Does not require Arduino Motor Shield
- For Arduino, the programming can very easily modifiable
- Cost effective
Disadvantages
- The ultrasonic sensor cannot be connected directly to the power supply, this affects the performance of the robot.
Applications
- Automatic cars.
- Military camps.
- Robot Vacuum Cleaners.
- Mobile robot navigation system.
- Can be used in places dangerous for human beings.
See also: GSM based Fire Alarm System using Arduino – IoT Project
Let us know your comment on “Obstacle avoiding robot using Arduino” in the section below.
If you like this post subscribe our YouTube Channel for IoT video Tutorials.
Start your IoT journey with IoT Basics from IoTDunia.
Reference and Image credit:
Image 1, 2 and 3 credit: instructables