
NodeMCU ESP8266
NodeMCU is an open source IoT platform also very easy use. It includes Lua scripting language based firmware which runs on the ESP8266-12E Wi-Fi SoC from Espressif Systems.
The term “NodeMCU” by default refers to the firmware rather than the dev kits. The NodeMcu also has micro USB port to connect to PC using micro USB cable.
NodeMcu can be programmed with Arduino IDE.
The NodeMcu Development Board based on ESP 8266 which has :-
- 17 GPIO
- PWM (Pulse Width Modulation)
- I2C
- 1-Wire ADC
- Power the development in the fastest way of combination with Node-Mcu Firmware.
How to flash a Firmware to NodeMcu:
You can flash new firmware by using ESP8266Flasher.exe. The newest firmware can be found here.
- Download the ESP8266 Flasher from here
- Download Latest firmware from here
- Connect your NodeMcu Dev Board to Laptop using USB cable
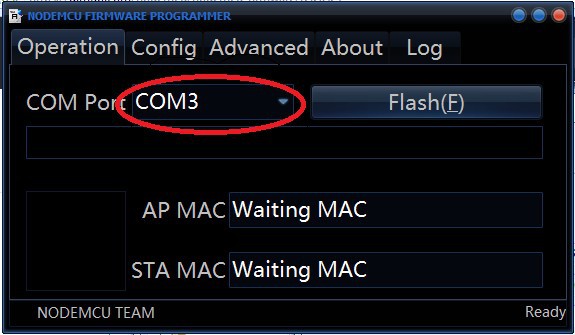
Open ESP8266 Flasher Select COM port on which NodeMcu is connected to Laptop.
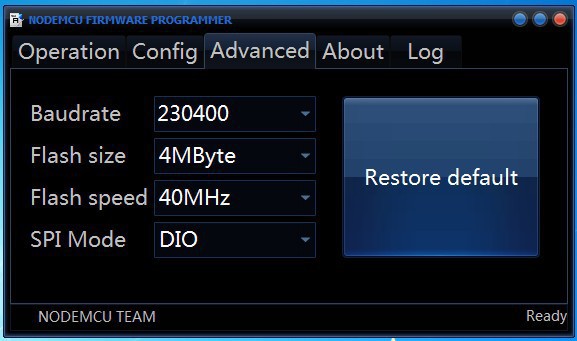
Goto advance setting and select baud rate,flash size etc
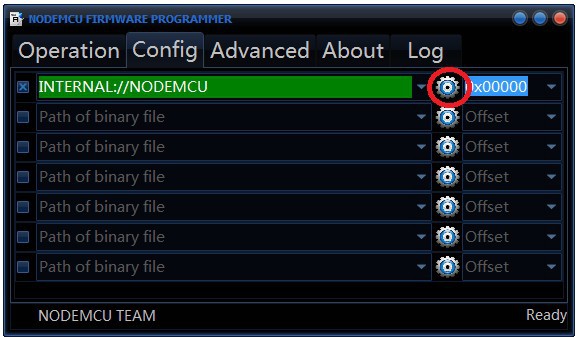
Goto configure click on setting to select latest binary flash to NodeMcu
next is > click on flash button to flash firmware
NodeMCU Pinout
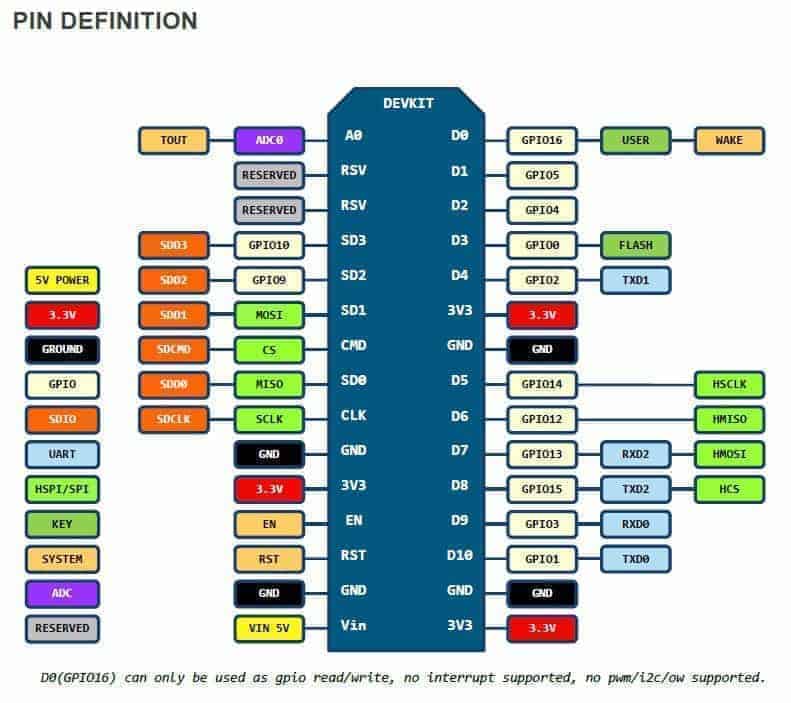
Image credit:- GitHub
- General Purpose Input/output Interface (GPIO)
- NodeMcu has 17 GPIO pins
- GPIO pins also Multiplexed with other functions, like I2C, I2S, UART, PWM, IR Control, LED and Button, etc.
- analogRead(A0) or analogWrite(pin, value) –To read or Write on analog pin.
- pinMode, digitalRead, and digitalWrite – Digital IO Configuration.
- Serial Peripheral Interface (SPI/HSPI): Node-Mcu has three SPIs.
- One general Slave/Master SPI
- One Slave SDIO/SPI
- One general Slave/Master HSPI
- I2C Interface
- one I2C that can be connected to microcontroller and other peripherals such as sensors.
- Both I2C Master and I2C Slave are supported.
- I2C can be realized via software programming, and the clock frequency is 100 kHz at a maximum.
- Timing and delays
- millis() and micros() return the number of milliseconds and microseconds elapsed after reset, respectively.
- delay(ms) pauses the sketch for a given number of milliseconds and allows WiFi and TCP/IP tasks to run. delayMicroseconds(us) pauses for a given number of microseconds.
The list of IO index number assigned to each GPIO as per below table.
| GPIO Pin | I/O Index Number |
|---|---|
| GPIO0 | 3 |
| GPIO1 | 10 |
| GPIO2 | 4 |
| GPIO3 | 9 |
| GPIO4 | 2 |
| GPIO5 | 1 |
| GPIO6 | N/A |
| GPIO7 | N/A |
| GPIO8 | N/A |
| GPIO9 | 11 |
| GPIO10 | 12 |
| GPIO11 | N/A |
| GPIO12 | 6 |
| GPIO13 | 7 |
| GPIO14 | 5 |
| GPIO15 | 8 |
| GPIO16 | 0 |
Let us know what you think about NodeMCU for Arduino, share your comments in the section below.
If you like this post subscribe our YouTube Channel for IoT video Tutorials.
Documents for detail study
- Node MCU is an eLua based firmware
- Node MCU Development kit
- ESP8266 Flasher